Growing up, I remember the aroma of turmeric wafting through my grandmother's kitchen, a spice that not only added flavor but also boasted incredible health benefits. Fast forward to today, you can grow this golden spice right in your backyard! In this blog post, I'll be sharing my step-by-step journey with turmeric—from planting those vibrant tubers to transforming them into fine powder of sunshine.
Planting Turmeric: Best Practices
Growing turmeric can be an exciting journey. I’ve found that with the right practices, anyone can cultivate this vibrant spice at home. Let’s dive into some best practices for planting turmeric that I've discovered over time.
First things first, the soil is crucial. Turmeric thrives in well-draining soil. I recommend using a potting mix made from:
- Peat moss
- Perlite or vermiculite
- Compost
This combination not only retains moisture but also allows excess water to drain away. If you already have potting soil, you can enrich it with extra peat moss or coco coir. This will help keep the moisture levels just right.
Container Size Matters
When it comes to container gardening, size does matter! I’ve noticed that larger containers yield better results. Ideally, you should aim for a container size of 7 to 10 gallons for about three turmeric plants. Why? More space means the roots can spread out, leading to healthier plants and more robust yields.
Imagine trying to grow a tree in a tiny pot. It just wouldn’t work, right? The same goes for turmeric. A spacious environment allows for optimal growth.
Exploring Planting Methods
Now, let’s talk about how to plant turmeric. There are a couple of methods you can explore:
- Using tubers: These are the roots of the turmeric plant. You can either plant whole tubers or cut pieces from previously harvested roots.
- Child plants: These are smaller plants that grow around the base of the mother plant. They can be harvested and replanted as well.
Both methods work well, but I personally prefer using organic turmeric tubers sourced from farmers' markets. They tend to be fresh and healthy, which is vital for a successful planting.
“Both pronunciations of turmeric are correct!”
Sunlight Requirements
Another important factor is sunlight. Turmeric needs about six hours of sunlight daily for optimal growth. If you can provide full sun or partial shade, that’s perfect! I’ve found that the right amount of sunlight can make a world of difference.
Notes on Care
Once you’ve planted your turmeric, caring for it is relatively straightforward. During the initial growth stages, especially on hot days, make sure to keep the plants well-watered. I usually water them once a day. However, in cooler or cloudier weather, I reduce watering to two or three times a week.
Interestingly, turmeric plants don’t always require fertilizer if you’re using quality compost. But, if you want to boost their growth, an all-purpose fertilizer can help. Just remember, a well-maintained turmeric plant should have vibrant leaves and thrive in warm weather.
Harvesting Tips
When it comes time to harvest, you’ll be excited to see the fruits of your labor. From my experience, harvesting from a five-gallon container yields a modest amount, while raised beds can produce significantly more. After harvesting, wash the turmeric and dry it until it turns lightly brown before peeling. This step is crucial for making turmeric powder.
To achieve that vivid yellow color in your turmeric powder, peel the tubers before drying them. You can sun-dry them for about five to seven days or use a dehydrator for quicker results. I often use my Blendtec blender to grind the dried turmeric. It’s an excellent investment for making any type of powder.
In the end, growing turmeric is not only rewarding but also incredibly beneficial. You’ll have fresh turmeric at your fingertips, ready to elevate your dishes and smoothies. So, why not give it a try? Your culinary adventures await!
Caring for Your Turmeric Plants
Caring for turmeric plants is essential for a robust yield. If you want to grow healthy turmeric, understanding the basics of watering, nutrients, and mulching is key. Let’s dive into each aspect!
Watering Frequency
Watering is crucial, especially during the development stages of your turmeric plants. I usually aim to water them daily when they’re young. This helps to establish strong roots. But remember, it’s not just about sticking to a schedule. The weather plays a significant role.
On hot days, these plants can use more water. I’ve found that they thrive with 1-3 times weekly watering, depending on the weather conditions. If it’s cooler or cloudy, you might not need to water as often. Always check the soil moisture before watering. Is it dry? Then it’s time to hydrate!
Nutrient Requirements
When it comes to nutrients, turmeric plants are quite forgiving. In fact, I often say that
“Turmeric plants don’t require heavy feeding when using quality compost.”
This is a game changer! Quality compost provides all the nutrients your plants need without the risk of over-fertilizing.
- Compost: Rich in organic matter, it improves soil structure and moisture retention.
- Fertilizers: While they can boost growth, I prefer to stick with compost. It’s natural and effective.
Turmeric generally thrives without fertilizers. If you feel your plants need a little extra, an all-purpose fertilizer can enhance their vigor. But I’ve had great results sticking with compost. It’s like giving your plants a warm hug!
Mulching Benefits
Let’s not forget about mulching. It’s a simple yet effective practice. Mulching helps retain moisture in the soil. This is especially beneficial during hot, dry spells. I often use straw or wood chips as mulch. They not only keep the soil moist but also suppress weeds.
Think of mulch as a protective blanket for your plants. It keeps the soil cool and moist, allowing your turmeric to grow happily. Plus, as it breaks down, it adds more nutrients back into the soil. It’s a win-win!
Harvesting Season
Now that we’ve covered care, let’s talk about harvesting. The harvesting season for turmeric typically runs from March to September. This is when the plants are at their peak. You’ll know it’s time to harvest when the leaves start to yellow and die back. It’s like nature’s signal that it’s time to reap the rewards of your hard work!
As you prepare for harvest, remember that healthy turmeric plants will display vibrant leaves. This indicates good health and optimal conditions. A well-cared-for plant can yield a bountiful harvest.
Harvesting and Processing Turmeric
Growing turmeric is a rewarding journey that culminates in the exciting process of harvesting and processing the vibrant root. So, how do we know when it's time to dig up our turmeric? Let’s explore this together!
Signs of Readiness
Recognizing the right time to harvest turmeric is crucial. You’ll want to look for a few telltale signs:
- Vibrant leaves: Healthy, green leaves indicate that your turmeric is thriving.
- Shrinking soil: As the tubers mature, the soil around them may begin to shrink. This is a sign that they are ready to be harvested.
Do you ever wonder what goes on beneath the surface? It’s fascinating! The growth cycle of turmeric is essential to understand. When the leaves start to yellow and die back, it’s a signal that the tubers are ready for harvest. This usually happens around 8-10 months after planting.
Harvesting Techniques for Maximum Yield
When it’s time to harvest, the technique you use can significantly affect your yield. Here are some tips I’ve learned:
- Use a garden fork: Gently loosen the soil around the base of the plant to avoid damaging the tubers.
- Lift carefully: Pull the plant out of the ground, ensuring that you retrieve all the tubers. Missing even a small piece can lead to future growth in unwanted places.
- Inspect your yield: A good harvest should provide a decent amount of turmeric for various uses.
It’s amazing to see the fruits of your labor! Harvesting can be a joyful experience, especially when you see those bright orange roots. Remember, the quality of your turmeric largely depends on how you manage the growth cycle and the harvesting process.
Preparing Turmeric Powder
Once you’ve harvested your turmeric, the next step is processing it into powder. Here’s how I do it:
- Washing: Start by thoroughly washing the tubers to remove any dirt or debris.
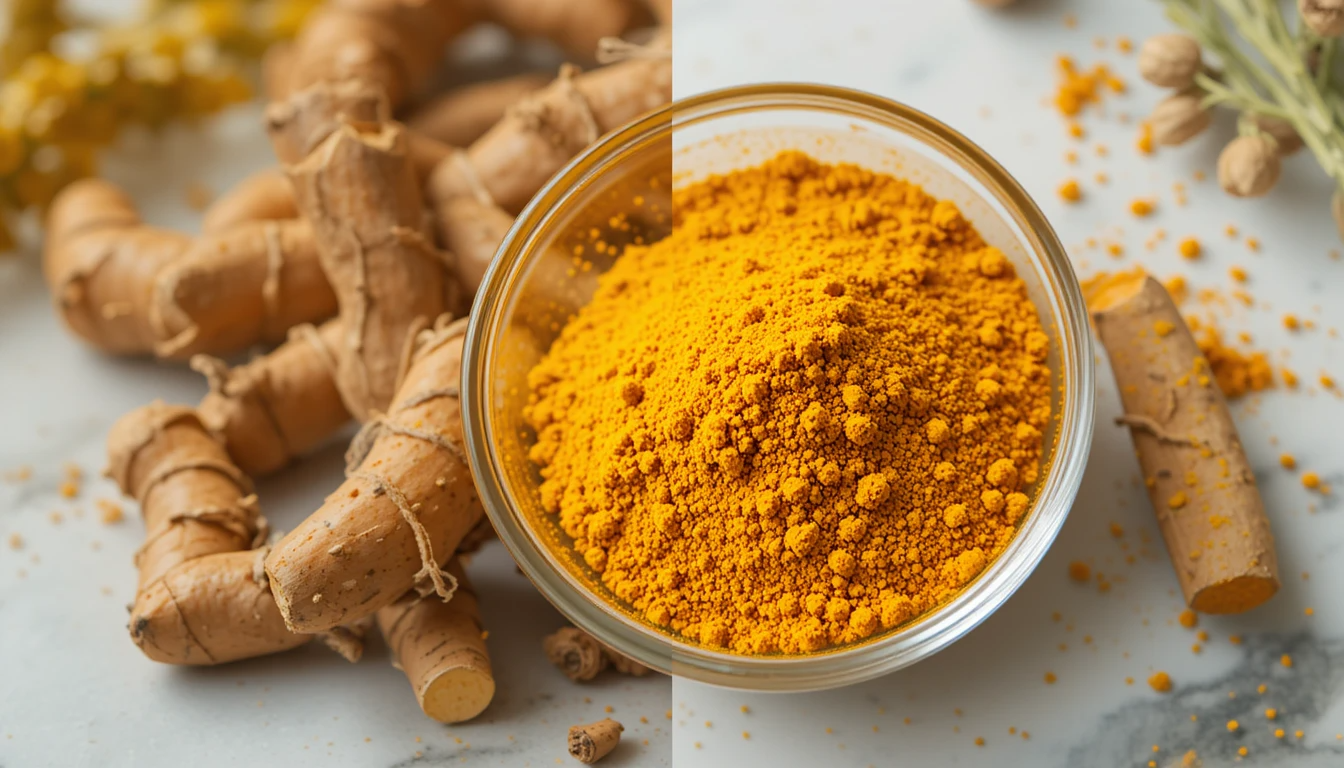
- Peeling: This step is crucial! Peeling the tubers is essential for achieving that stunning bright yellow color in your turmeric powder. I can’t stress enough how much this impacts the final product.
- Dehydrating: You can sun-dry the peeled turmeric for about 5-7 days or use a dehydrator for quicker results.
After drying, the next step is grinding. I usually use a powerful blender for this. It’s an investment that pays off, yielding a vibrant yellow turmeric powder. The difference in color is striking! If you skip the peeling, you might end up with a reddish powder instead, which isn’t quite as appealing.
"Fresh turmeric smells incredible and tastes fantastic, too!"
Final Thoughts
The journey ends with harvesting, where one can enjoy both the process and the fruits of their labor by making fresh turmeric powder. It’s not just about the end product; it’s about the experience of growing and nurturing your plants. When you finally taste your homemade turmeric powder, you’ll realize just how worth it the effort is.
So, are you ready to dive into the world of turmeric? I encourage you to give it a try! You’ll not only enjoy the process but also reap the health benefits of fresh turmeric in your meals. Happy gardening!
🌿👉 Unlock Your Garden's Potential: Click Here for Eco-Friendly Gardening Secrets
TL;DR: Growing turmeric at home is rewarding! With the right soil and care, anyone can cultivate turmeric and make delicious spice powder. Simple techniques and deep health benefits await.
Kudos to "California Gardening (Organic, Easy Garden Tips)" for the insightful content. Check it out here: https://www.youtube.com/watch?v=d9wWPDpdS_I.
Affiliate Disclaimer: This article may contain affiliate links. This means that if you click on a link and make a purchase, I may receive a small commission at no extra cost to you. I only recommend products and services that I believe in and that I think will be valuable to my readers.
AI Content Disclaimer: This article was partially assisted by AI writing tools. While AI was used to generate some of the text, all information and opinions expressed are those of the author.
.jpeg)
.jpeg)


Comments
Post a Comment